
iMap Help
Download the full PDF User Guide
Quickstart Guide
The iMap Interface: There are six areas within the iMap interface that you will want to become familiar with. These include the content window, zoom slide bar, tool bar, map display, geographic coordinates, and the map scale
Content Window: The content window is a multi-function window that provides access to Additional Maps; displays the Legend of the current map; displays the Map Description of the current map; provides a map Layer List enabling the user to turn specific layers on or off; and Search tools to quickly navigate to an address, street, property number, or owner name. On some maps, there may be a Map Tools tab to provide additional mapping capabilities. For example, the Incidents and Registered Sex Offender map provides additional Map Tools to view incidents over a specific time period or to view incidents by incident type. By default the map Legend is displayed in the content window. If the map has additional Map Tools available the Map Tool tab becomes the default tab being displayed.
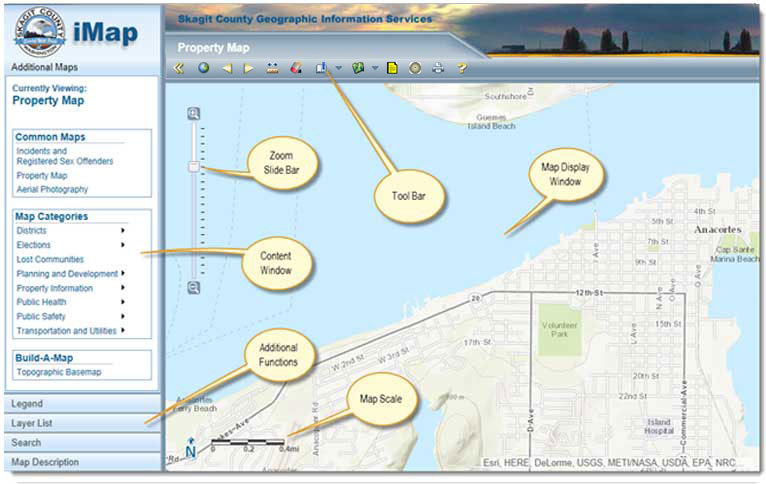
Tool Bar Tools: There are other tools available to help you navigate, measure, and print. The following is a list of these tools and instructions on how to operate them.

 provides the ability to expand or contract the content window giving the user the ability to hide the content window in order to see more map real-estate on their screen.
 provides the user with the ability to move or slide the screen to the area of interest. This tool is invoked by holding the left mouse button down, anywhere within the map display window, and moving the map display to the desired position. The pan symbol appears when activated.
 is designed to quickly zoom the map to the outer map extents of Skagit County.
 will zoom you to the previous (backward) map extent. This tool only works if you have zoomed to a location on the map.
 will zoom you to the next (forward) map extent. This tool only works if you have zoomed to a location on the map.
 The measure tools provide the user with the ability to measure distances, areas, point locations, and elevations (elevations are only displayed when viewing aerial imagery). Units can be changed for distances (miles, feet, kilometers, yards, and meters) and areas (acres, square miles, square kilometers, hectares, square yards, square feet, and square meters) and location information can be changed from Latitude Longitude decimal degrees to degrees-minutes-seconds. All measurements using these tools are approximate and should not be used for precise measurements. and then select the area tool
  from the menu. Next select the units pull-down and choose the units you would like displayed. This can also be done after an area has been measured. Now start picking positions on the map with your left mouse button to delineate the area. To close the area double click the left mouse button and the area will snap shut. The measurement results will be displayed on the measurement tool menu. Note: you can delineate an area larger than what you can see on the screen. To do this, just hold the left mouse button down when you get to the edge of the map and drag the map to continue. The area tool will remain activated allowing you to continue to delineate the area. If you are done measuring, close the measurement tool by picking the “X” in the upper right corner of the dialog box. This will also clear the measurement graphics. and then select the distance tool
  from the menu. Next select the units pull-down and choose the units you would like displayed. This can also be done after an area has been measured. Now start picking positions on the map with your left mouse button to measure the distance. To finish measuring, double click the left mouse button and the measurement results will be displayed on the measurement tool menu. Note: you can measure a distance larger than what you can see on the screen. To do this, just hold the left mouse button down when you get to the edge of the map and drag the map to continue. The distance tool will remain activated allowing you to continue to measure. If you are done measuring, close the measurement tool by picking the “X” in the upper right corner of the dialog box. This will also clear the measurement graphics. and then select the location tool
  from the menu. Next select the units pull-down and choose the units you would like displayed. This can also be done after a location has been selected. Now pick a location on the map with your left mouse button and the measurement results will be displayed on the measurement tool menu. If you are done measuring, close the measurement tool by picking the “X” in the upper right corner of the dialog box. This will also clear the measurement graphics.
 is selected. If more parcels are selected, they too will remain highlighted until the “Remove Current Graphics” tool is selected. Once the tool is selected all highlighted graphics will be removed. Please note that the highlighted parcel(s) may appear to be in the wrong location when displaying on an aerial map. The highlight is merely a rough approximation of the parcel(s) and should not be considered accurate.
 provides the user with a quick way to navigate to desired regions within Skagit County. To use this tool, first pick the tool icon. This will display a list of regions within Skagit County. Next, select the region you want to navigate too and iMap will change the map display to hover over that region. This drop down menu includes the view "Full County" which will return the user to the original overview map of Skagit County and surrounding areas.
 provides the user with the ability to print a map. To print your current map display simply select the print tool icon, enter the Map Title (optional), enter the Map Author (optional), and select the Page Size. The iMap application will begin printing the map and display the results to the screen. At this point, you can save the map as a PDF file to your disk drive or you can pick the print function on your browser window and print the file.
 provides the user with the same information as the Additional Maps tab located in the contents window. This is just another way for the user to easily access additional maps
 will return land-related documents recorded in the Auditor's Office (years 1978 to the present) that have been coded with Section, Township, and Range information. The tool allows you to search by address, parcel id, Section-Township-Range, or by picking a location on the map. Any of the above search methods will search the nearest square mile and retrieve the land-related documents. This tool also provides a link to the Assessor Map once a section has been made.
 provides the user with the ability to create a list of property owners within a predefined distance (300, 500, or 1,000 feet) of a selected property. To use this tool navigate to a neighborhood that you’re interested in. Be sure that you are in the Property Map and that the parcels can easily be seen on the screen. Next, select the list tool from the tool bar. After you have selected the tool, move your cursor into the map display and “left mouse click” the parcels you would like to apply the buffer too. To end your selection you must hold the “Shift” key down and then pick the left mouse button. A dialog box will pop-up displaying several buffer distances you can choose from (300, 500, or 1,000 feet). Once you pick the desired distance, the tool applies the buffer to the map and creates a list of property owners. You can then export the list to a CSV file that can be imported into a spreadsheet or word processor. To end the tool, simply dismiss the dialog box by picking “X” in the upper right corner of the dialog box. To get rid of the graphics, pick the “remove all graphics” tool.

